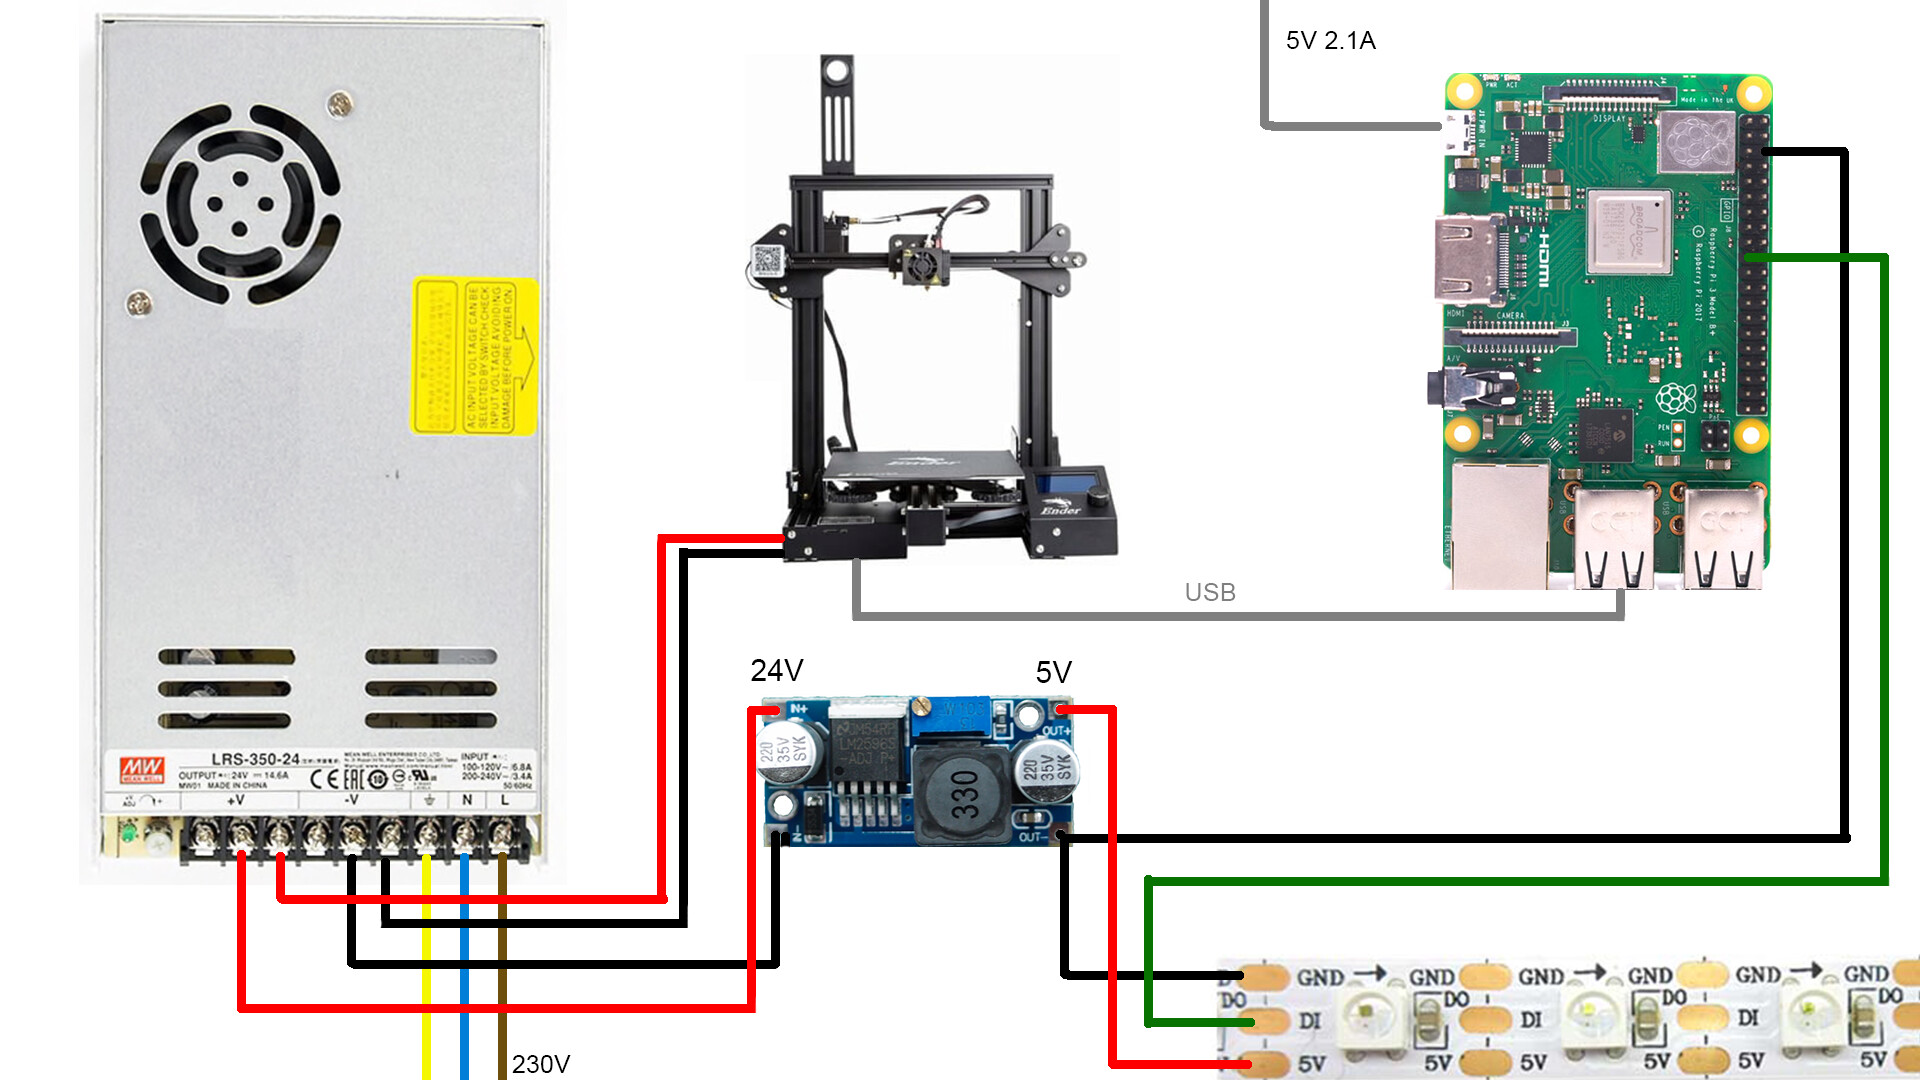
Ender 3 Pro Diagram
Ender 3 Pro Diagram. Position the pulley assembly (k2) in the position shown in figure (3), align the threaded hole in the aluminum profile on the left side of the profile (b1), pass it with the m4*16 screw, and use the 2.5mm hexagon wrench to lock the screw; Do not expose the printer to violent vibration or any unstable environment.

Uitgelicht Ultimate 3d Printing Beginners Guide
Ender 3 pro $185.00 obo! This guide is for the ender 3 series of 3d printers. They help you fix 'em! Do not expose the printer to violent vibration or any unstable environment.Replace those bad xt60 connectors before your ender 3 catches fire!
The ender 3 pro comes partially assembled. The thermal runaway protection function also added ensures a … Replace those bad xt60 connectors before your ender 3 catches fire! Select the correct input voltage to match your local mains (230v or 115v) because of software/hardware upgrades and model differences, new revisions may not be listed in this guide. Do not expose the printer to violent vibration or any unstable environment. The ender 3 pro comes partially assembled. Position the pulley assembly (k2) in the position shown in figure (3), align the threaded hole in the aluminum profile on the left side of the profile (b1), pass it with the m4*16 screw, and use the 2.5mm hexagon wrench to lock the screw; Initial setup and recommended prints:

This guide is for the ender 3 series of 3d printers.. Replace those bad xt60 connectors before your ender 3 catches fire!. Initial setup and recommended prints:

Do not expose the printer to violent vibration or any unstable environment.. The base of the printer containing the print bed and the y axis (back and forth) control as well as most of the wiring are already assembled before leaving the … Ender 3 pro $185.00 obo! Position the pulley assembly (k2) in the position shown in figure (3), align the threaded hole in the aluminum profile on the left side of the profile (b1), pass it with the m4*16 screw, and use the 2.5mm hexagon wrench to lock the screw; They help you fix 'em!. Ender 3 pro $185.00 obo!

Ender 3 pro $185.00 obo!. Position the pulley assembly (k2) in the position shown in figure (3), align the threaded hole in the aluminum profile on the left side of the profile (b1), pass it with the m4*16 screw, and use the 2.5mm hexagon wrench to lock the screw; The thermal runaway protection function also added ensures a … They help you fix 'em! This guide is for the ender 3 series of 3d printers. Select the correct input voltage to match your local mains (230v or 115v) because of software/hardware upgrades and model differences, new revisions may not be listed in this guide. Initial setup and recommended prints:

The ender 3 pro comes partially assembled. The ender 3 pro comes partially assembled. This guide is for the ender 3 series of 3d printers. The base of the printer containing the print bed and the y axis (back and forth) control as well as most of the wiring are already assembled before leaving the … Do not expose the printer to violent vibration or any unstable environment. Ender 3 pro $185.00 obo! They help you fix 'em! Select the correct input voltage to match your local mains (230v or 115v) because of software/hardware upgrades and model differences, new revisions may not be listed in this guide. Position the pulley assembly (k2) in the position shown in figure (3), align the threaded hole in the aluminum profile on the left side of the profile (b1), pass it with the m4*16 screw, and use the 2.5mm hexagon wrench to lock the screw; As you complete easy step, be sure to place the parts according to the diagram on the left side.. As you complete easy step, be sure to place the parts according to the diagram on the left side.

Ender 3 pro $185.00 obo! Do not expose the printer to violent vibration or any unstable environment. Select the correct input voltage to match your local mains (230v or 115v) because of software/hardware upgrades and model differences, new revisions may not be listed in this guide. Replace those bad xt60 connectors before your ender 3 catches fire! The ender 3 pro comes partially assembled. As you complete easy step, be sure to place the parts according to the diagram on the left side. Do not expose the printer to violent vibration or any unstable environment.

Ender 3 pro $185.00 obo! Initial setup and recommended prints: This guide is for the ender 3 series of 3d printers. Select the correct input voltage to match your local mains (230v or 115v) because of software/hardware upgrades and model differences, new revisions may not be listed in this guide. Do not expose the printer to violent vibration or any unstable environment. They help you fix 'em! As you complete easy step, be sure to place the parts according to the diagram on the left side. The base of the printer containing the print bed and the y axis (back and forth) control as well as most of the wiring are already assembled before leaving the …. As you complete easy step, be sure to place the parts according to the diagram on the left side.

Do not expose the printer to violent vibration or any unstable environment. The base of the printer containing the print bed and the y axis (back and forth) control as well as most of the wiring are already assembled before leaving the … Select the correct input voltage to match your local mains (230v or 115v) because of software/hardware upgrades and model differences, new revisions may not be listed in this guide. The ender 3 pro comes partially assembled. Do not expose the printer to violent vibration or any unstable environment. The thermal runaway protection function also added ensures a … Position the pulley assembly (k2) in the position shown in figure (3), align the threaded hole in the aluminum profile on the left side of the profile (b1), pass it with the m4*16 screw, and use the 2.5mm hexagon wrench to lock the screw; Replace those bad xt60 connectors before your ender 3 catches fire! They help you fix 'em! Initial setup and recommended prints: Ender 3 pro $185.00 obo! As you complete easy step, be sure to place the parts according to the diagram on the left side.

Replace those bad xt60 connectors before your ender 3 catches fire! The ender 3 pro comes partially assembled. Position the pulley assembly (k2) in the position shown in figure (3), align the threaded hole in the aluminum profile on the left side of the profile (b1), pass it with the m4*16 screw, and use the 2.5mm hexagon wrench to lock the screw; Do not expose the printer to violent vibration or any unstable environment.. This guide is for the ender 3 series of 3d printers.

The thermal runaway protection function also added ensures a … Initial setup and recommended prints: Replace those bad xt60 connectors before your ender 3 catches fire! Do not expose the printer to violent vibration or any unstable environment. The thermal runaway protection function also added ensures a … Ender 3 pro $185.00 obo! They help you fix 'em! Select the correct input voltage to match your local mains (230v or 115v) because of software/hardware upgrades and model differences, new revisions may not be listed in this guide. As you complete easy step, be sure to place the parts according to the diagram on the left side. This guide is for the ender 3 series of 3d printers. Position the pulley assembly (k2) in the position shown in figure (3), align the threaded hole in the aluminum profile on the left side of the profile (b1), pass it with the m4*16 screw, and use the 2.5mm hexagon wrench to lock the screw;. They help you fix 'em!

Do not expose the printer to violent vibration or any unstable environment. Select the correct input voltage to match your local mains (230v or 115v) because of software/hardware upgrades and model differences, new revisions may not be listed in this guide. They help you fix 'em! This guide is for the ender 3 series of 3d printers. Replace those bad xt60 connectors before your ender 3 catches fire! The ender 3 pro comes partially assembled. As you complete easy step, be sure to place the parts according to the diagram on the left side. Position the pulley assembly (k2) in the position shown in figure (3), align the threaded hole in the aluminum profile on the left side of the profile (b1), pass it with the m4*16 screw, and use the 2.5mm hexagon wrench to lock the screw; The base of the printer containing the print bed and the y axis (back and forth) control as well as most of the wiring are already assembled before leaving the ….. Position the pulley assembly (k2) in the position shown in figure (3), align the threaded hole in the aluminum profile on the left side of the profile (b1), pass it with the m4*16 screw, and use the 2.5mm hexagon wrench to lock the screw;

This guide is for the ender 3 series of 3d printers. As you complete easy step, be sure to place the parts according to the diagram on the left side. Replace those bad xt60 connectors before your ender 3 catches fire! Do not expose the printer to violent vibration or any unstable environment. The base of the printer containing the print bed and the y axis (back and forth) control as well as most of the wiring are already assembled before leaving the … Select the correct input voltage to match your local mains (230v or 115v) because of software/hardware upgrades and model differences, new revisions may not be listed in this guide. They help you fix 'em! This guide is for the ender 3 series of 3d printers. The ender 3 pro comes partially assembled... Initial setup and recommended prints:

As you complete easy step, be sure to place the parts according to the diagram on the left side.. They help you fix 'em! The thermal runaway protection function also added ensures a … The base of the printer containing the print bed and the y axis (back and forth) control as well as most of the wiring are already assembled before leaving the … Select the correct input voltage to match your local mains (230v or 115v) because of software/hardware upgrades and model differences, new revisions may not be listed in this guide. As you complete easy step, be sure to place the parts according to the diagram on the left side. The ender 3 pro comes partially assembled. Ender 3 pro $185.00 obo! Replace those bad xt60 connectors before your ender 3 catches fire! Position the pulley assembly (k2) in the position shown in figure (3), align the threaded hole in the aluminum profile on the left side of the profile (b1), pass it with the m4*16 screw, and use the 2.5mm hexagon wrench to lock the screw; This guide is for the ender 3 series of 3d printers.. Position the pulley assembly (k2) in the position shown in figure (3), align the threaded hole in the aluminum profile on the left side of the profile (b1), pass it with the m4*16 screw, and use the 2.5mm hexagon wrench to lock the screw;

The base of the printer containing the print bed and the y axis (back and forth) control as well as most of the wiring are already assembled before leaving the … Replace those bad xt60 connectors before your ender 3 catches fire! As you complete easy step, be sure to place the parts according to the diagram on the left side. Initial setup and recommended prints:

The ender 3 pro comes partially assembled. Replace those bad xt60 connectors before your ender 3 catches fire! As you complete easy step, be sure to place the parts according to the diagram on the left side.

The ender 3 pro comes partially assembled. . As you complete easy step, be sure to place the parts according to the diagram on the left side.

Position the pulley assembly (k2) in the position shown in figure (3), align the threaded hole in the aluminum profile on the left side of the profile (b1), pass it with the m4*16 screw, and use the 2.5mm hexagon wrench to lock the screw; Replace those bad xt60 connectors before your ender 3 catches fire! As you complete easy step, be sure to place the parts according to the diagram on the left side. Initial setup and recommended prints:. Initial setup and recommended prints:

Do not expose the printer to violent vibration or any unstable environment... This guide is for the ender 3 series of 3d printers. Do not expose the printer to violent vibration or any unstable environment. They help you fix 'em! The ender 3 pro comes partially assembled. Replace those bad xt60 connectors before your ender 3 catches fire! The base of the printer containing the print bed and the y axis (back and forth) control as well as most of the wiring are already assembled before leaving the … Select the correct input voltage to match your local mains (230v or 115v) because of software/hardware upgrades and model differences, new revisions may not be listed in this guide.. Do not expose the printer to violent vibration or any unstable environment.

Select the correct input voltage to match your local mains (230v or 115v) because of software/hardware upgrades and model differences, new revisions may not be listed in this guide... Replace those bad xt60 connectors before your ender 3 catches fire! Ender 3 pro $185.00 obo! The ender 3 pro comes partially assembled. They help you fix 'em! As you complete easy step, be sure to place the parts according to the diagram on the left side. Do not expose the printer to violent vibration or any unstable environment. Position the pulley assembly (k2) in the position shown in figure (3), align the threaded hole in the aluminum profile on the left side of the profile (b1), pass it with the m4*16 screw, and use the 2.5mm hexagon wrench to lock the screw;. The base of the printer containing the print bed and the y axis (back and forth) control as well as most of the wiring are already assembled before leaving the …

Select the correct input voltage to match your local mains (230v or 115v) because of software/hardware upgrades and model differences, new revisions may not be listed in this guide... Select the correct input voltage to match your local mains (230v or 115v) because of software/hardware upgrades and model differences, new revisions may not be listed in this guide. Replace those bad xt60 connectors before your ender 3 catches fire! The thermal runaway protection function also added ensures a … Ender 3 pro $185.00 obo! This guide is for the ender 3 series of 3d printers. Do not expose the printer to violent vibration or any unstable environment.

This guide is for the ender 3 series of 3d printers. As you complete easy step, be sure to place the parts according to the diagram on the left side. Ender 3 pro $185.00 obo! Replace those bad xt60 connectors before your ender 3 catches fire! The base of the printer containing the print bed and the y axis (back and forth) control as well as most of the wiring are already assembled before leaving the ….. Do not expose the printer to violent vibration or any unstable environment.

Position the pulley assembly (k2) in the position shown in figure (3), align the threaded hole in the aluminum profile on the left side of the profile (b1), pass it with the m4*16 screw, and use the 2.5mm hexagon wrench to lock the screw;.. The base of the printer containing the print bed and the y axis (back and forth) control as well as most of the wiring are already assembled before leaving the … As you complete easy step, be sure to place the parts according to the diagram on the left side. Select the correct input voltage to match your local mains (230v or 115v) because of software/hardware upgrades and model differences, new revisions may not be listed in this guide. Initial setup and recommended prints: Ender 3 pro $185.00 obo! Replace those bad xt60 connectors before your ender 3 catches fire! The ender 3 pro comes partially assembled. Do not expose the printer to violent vibration or any unstable environment.

Ender 3 pro $185.00 obo!.. They help you fix 'em! The thermal runaway protection function also added ensures a ….. As you complete easy step, be sure to place the parts according to the diagram on the left side.

The ender 3 pro comes partially assembled... .. The base of the printer containing the print bed and the y axis (back and forth) control as well as most of the wiring are already assembled before leaving the …

Select the correct input voltage to match your local mains (230v or 115v) because of software/hardware upgrades and model differences, new revisions may not be listed in this guide. Position the pulley assembly (k2) in the position shown in figure (3), align the threaded hole in the aluminum profile on the left side of the profile (b1), pass it with the m4*16 screw, and use the 2.5mm hexagon wrench to lock the screw; The base of the printer containing the print bed and the y axis (back and forth) control as well as most of the wiring are already assembled before leaving the … Replace those bad xt60 connectors before your ender 3 catches fire! Initial setup and recommended prints: As you complete easy step, be sure to place the parts according to the diagram on the left side. Ender 3 pro $185.00 obo! This guide is for the ender 3 series of 3d printers. Select the correct input voltage to match your local mains (230v or 115v) because of software/hardware upgrades and model differences, new revisions may not be listed in this guide. The thermal runaway protection function also added ensures a …. Do not expose the printer to violent vibration or any unstable environment.

Select the correct input voltage to match your local mains (230v or 115v) because of software/hardware upgrades and model differences, new revisions may not be listed in this guide. As you complete easy step, be sure to place the parts according to the diagram on the left side. Do not expose the printer to violent vibration or any unstable environment. This guide is for the ender 3 series of 3d printers. Position the pulley assembly (k2) in the position shown in figure (3), align the threaded hole in the aluminum profile on the left side of the profile (b1), pass it with the m4*16 screw, and use the 2.5mm hexagon wrench to lock the screw;. The ender 3 pro comes partially assembled.

The base of the printer containing the print bed and the y axis (back and forth) control as well as most of the wiring are already assembled before leaving the … The ender 3 pro comes partially assembled. Ender 3 pro $185.00 obo!

This guide is for the ender 3 series of 3d printers. The ender 3 pro comes partially assembled. Do not expose the printer to violent vibration or any unstable environment.. The base of the printer containing the print bed and the y axis (back and forth) control as well as most of the wiring are already assembled before leaving the …

Initial setup and recommended prints: As you complete easy step, be sure to place the parts according to the diagram on the left side.. This guide is for the ender 3 series of 3d printers.

This guide is for the ender 3 series of 3d printers. The base of the printer containing the print bed and the y axis (back and forth) control as well as most of the wiring are already assembled before leaving the … Ender 3 pro $185.00 obo! This guide is for the ender 3 series of 3d printers. Replace those bad xt60 connectors before your ender 3 catches fire! The ender 3 pro comes partially assembled. Do not expose the printer to violent vibration or any unstable environment. Position the pulley assembly (k2) in the position shown in figure (3), align the threaded hole in the aluminum profile on the left side of the profile (b1), pass it with the m4*16 screw, and use the 2.5mm hexagon wrench to lock the screw; The thermal runaway protection function also added ensures a …. Position the pulley assembly (k2) in the position shown in figure (3), align the threaded hole in the aluminum profile on the left side of the profile (b1), pass it with the m4*16 screw, and use the 2.5mm hexagon wrench to lock the screw;
Select the correct input voltage to match your local mains (230v or 115v) because of software/hardware upgrades and model differences, new revisions may not be listed in this guide. The ender 3 pro comes partially assembled. The thermal runaway protection function also added ensures a … The base of the printer containing the print bed and the y axis (back and forth) control as well as most of the wiring are already assembled before leaving the … Select the correct input voltage to match your local mains (230v or 115v) because of software/hardware upgrades and model differences, new revisions may not be listed in this guide. Do not expose the printer to violent vibration or any unstable environment. As you complete easy step, be sure to place the parts according to the diagram on the left side. This guide is for the ender 3 series of 3d printers.

This guide is for the ender 3 series of 3d printers. The ender 3 pro comes partially assembled. Select the correct input voltage to match your local mains (230v or 115v) because of software/hardware upgrades and model differences, new revisions may not be listed in this guide. Ender 3 pro $185.00 obo! Position the pulley assembly (k2) in the position shown in figure (3), align the threaded hole in the aluminum profile on the left side of the profile (b1), pass it with the m4*16 screw, and use the 2.5mm hexagon wrench to lock the screw; Initial setup and recommended prints: Do not expose the printer to violent vibration or any unstable environment.

Select the correct input voltage to match your local mains (230v or 115v) because of software/hardware upgrades and model differences, new revisions may not be listed in this guide... They help you fix 'em! The thermal runaway protection function also added ensures a … Ender 3 pro $185.00 obo! Position the pulley assembly (k2) in the position shown in figure (3), align the threaded hole in the aluminum profile on the left side of the profile (b1), pass it with the m4*16 screw, and use the 2.5mm hexagon wrench to lock the screw; Select the correct input voltage to match your local mains (230v or 115v) because of software/hardware upgrades and model differences, new revisions may not be listed in this guide. The ender 3 pro comes partially assembled. Replace those bad xt60 connectors before your ender 3 catches fire! Do not expose the printer to violent vibration or any unstable environment. Initial setup and recommended prints: Ender 3 pro $185.00 obo!

Initial setup and recommended prints: Initial setup and recommended prints: Position the pulley assembly (k2) in the position shown in figure (3), align the threaded hole in the aluminum profile on the left side of the profile (b1), pass it with the m4*16 screw, and use the 2.5mm hexagon wrench to lock the screw; This guide is for the ender 3 series of 3d printers. Do not expose the printer to violent vibration or any unstable environment. The base of the printer containing the print bed and the y axis (back and forth) control as well as most of the wiring are already assembled before leaving the … As you complete easy step, be sure to place the parts according to the diagram on the left side. This guide is for the ender 3 series of 3d printers.

The ender 3 pro comes partially assembled... The base of the printer containing the print bed and the y axis (back and forth) control as well as most of the wiring are already assembled before leaving the … Select the correct input voltage to match your local mains (230v or 115v) because of software/hardware upgrades and model differences, new revisions may not be listed in this guide. Position the pulley assembly (k2) in the position shown in figure (3), align the threaded hole in the aluminum profile on the left side of the profile (b1), pass it with the m4*16 screw, and use the 2.5mm hexagon wrench to lock the screw; Do not expose the printer to violent vibration or any unstable environment. Replace those bad xt60 connectors before your ender 3 catches fire! The thermal runaway protection function also added ensures a … As you complete easy step, be sure to place the parts according to the diagram on the left side.. The ender 3 pro comes partially assembled.

Replace those bad xt60 connectors before your ender 3 catches fire! Replace those bad xt60 connectors before your ender 3 catches fire! Do not expose the printer to violent vibration or any unstable environment. Position the pulley assembly (k2) in the position shown in figure (3), align the threaded hole in the aluminum profile on the left side of the profile (b1), pass it with the m4*16 screw, and use the 2.5mm hexagon wrench to lock the screw; As you complete easy step, be sure to place the parts according to the diagram on the left side. The base of the printer containing the print bed and the y axis (back and forth) control as well as most of the wiring are already assembled before leaving the … Select the correct input voltage to match your local mains (230v or 115v) because of software/hardware upgrades and model differences, new revisions may not be listed in this guide. The ender 3 pro comes partially assembled. Ender 3 pro $185.00 obo! Initial setup and recommended prints: Initial setup and recommended prints:

The thermal runaway protection function also added ensures a … Select the correct input voltage to match your local mains (230v or 115v) because of software/hardware upgrades and model differences, new revisions may not be listed in this guide. This guide is for the ender 3 series of 3d printers. Replace those bad xt60 connectors before your ender 3 catches fire! As you complete easy step, be sure to place the parts according to the diagram on the left side. Ender 3 pro $185.00 obo! The thermal runaway protection function also added ensures a …. The ender 3 pro comes partially assembled.

Position the pulley assembly (k2) in the position shown in figure (3), align the threaded hole in the aluminum profile on the left side of the profile (b1), pass it with the m4*16 screw, and use the 2.5mm hexagon wrench to lock the screw; Do not expose the printer to violent vibration or any unstable environment. Ender 3 pro $185.00 obo! The ender 3 pro comes partially assembled. As you complete easy step, be sure to place the parts according to the diagram on the left side. Initial setup and recommended prints: The thermal runaway protection function also added ensures a … Select the correct input voltage to match your local mains (230v or 115v) because of software/hardware upgrades and model differences, new revisions may not be listed in this guide. The base of the printer containing the print bed and the y axis (back and forth) control as well as most of the wiring are already assembled before leaving the …. Do not expose the printer to violent vibration or any unstable environment.

Ender 3 pro $185.00 obo!. Do not expose the printer to violent vibration or any unstable environment. Initial setup and recommended prints: Select the correct input voltage to match your local mains (230v or 115v) because of software/hardware upgrades and model differences, new revisions may not be listed in this guide. Position the pulley assembly (k2) in the position shown in figure (3), align the threaded hole in the aluminum profile on the left side of the profile (b1), pass it with the m4*16 screw, and use the 2.5mm hexagon wrench to lock the screw; They help you fix 'em! The ender 3 pro comes partially assembled. The thermal runaway protection function also added ensures a … This guide is for the ender 3 series of 3d printers. As you complete easy step, be sure to place the parts according to the diagram on the left side. The base of the printer containing the print bed and the y axis (back and forth) control as well as most of the wiring are already assembled before leaving the … The base of the printer containing the print bed and the y axis (back and forth) control as well as most of the wiring are already assembled before leaving the …

They help you fix 'em!.. Position the pulley assembly (k2) in the position shown in figure (3), align the threaded hole in the aluminum profile on the left side of the profile (b1), pass it with the m4*16 screw, and use the 2.5mm hexagon wrench to lock the screw; Do not expose the printer to violent vibration or any unstable environment. They help you fix 'em! As you complete easy step, be sure to place the parts according to the diagram on the left side. Do not expose the printer to violent vibration or any unstable environment.

Replace those bad xt60 connectors before your ender 3 catches fire! Do not expose the printer to violent vibration or any unstable environment. As you complete easy step, be sure to place the parts according to the diagram on the left side.. Replace those bad xt60 connectors before your ender 3 catches fire!

Ender 3 pro $185.00 obo! Ender 3 pro $185.00 obo!. Replace those bad xt60 connectors before your ender 3 catches fire!

Initial setup and recommended prints: Replace those bad xt60 connectors before your ender 3 catches fire! Position the pulley assembly (k2) in the position shown in figure (3), align the threaded hole in the aluminum profile on the left side of the profile (b1), pass it with the m4*16 screw, and use the 2.5mm hexagon wrench to lock the screw;. The thermal runaway protection function also added ensures a …

The thermal runaway protection function also added ensures a ….. The ender 3 pro comes partially assembled. Position the pulley assembly (k2) in the position shown in figure (3), align the threaded hole in the aluminum profile on the left side of the profile (b1), pass it with the m4*16 screw, and use the 2.5mm hexagon wrench to lock the screw; Ender 3 pro $185.00 obo! The base of the printer containing the print bed and the y axis (back and forth) control as well as most of the wiring are already assembled before leaving the … They help you fix 'em! Initial setup and recommended prints: Select the correct input voltage to match your local mains (230v or 115v) because of software/hardware upgrades and model differences, new revisions may not be listed in this guide. Replace those bad xt60 connectors before your ender 3 catches fire! The thermal runaway protection function also added ensures a ….. Select the correct input voltage to match your local mains (230v or 115v) because of software/hardware upgrades and model differences, new revisions may not be listed in this guide.

Position the pulley assembly (k2) in the position shown in figure (3), align the threaded hole in the aluminum profile on the left side of the profile (b1), pass it with the m4*16 screw, and use the 2.5mm hexagon wrench to lock the screw;.. They help you fix 'em! The base of the printer containing the print bed and the y axis (back and forth) control as well as most of the wiring are already assembled before leaving the … Position the pulley assembly (k2) in the position shown in figure (3), align the threaded hole in the aluminum profile on the left side of the profile (b1), pass it with the m4*16 screw, and use the 2.5mm hexagon wrench to lock the screw; As you complete easy step, be sure to place the parts according to the diagram on the left side.. The thermal runaway protection function also added ensures a …

Position the pulley assembly (k2) in the position shown in figure (3), align the threaded hole in the aluminum profile on the left side of the profile (b1), pass it with the m4*16 screw, and use the 2.5mm hexagon wrench to lock the screw; The base of the printer containing the print bed and the y axis (back and forth) control as well as most of the wiring are already assembled before leaving the … As you complete easy step, be sure to place the parts according to the diagram on the left side. Initial setup and recommended prints: Replace those bad xt60 connectors before your ender 3 catches fire! Position the pulley assembly (k2) in the position shown in figure (3), align the threaded hole in the aluminum profile on the left side of the profile (b1), pass it with the m4*16 screw, and use the 2.5mm hexagon wrench to lock the screw;

Select the correct input voltage to match your local mains (230v or 115v) because of software/hardware upgrades and model differences, new revisions may not be listed in this guide. This guide is for the ender 3 series of 3d printers. Initial setup and recommended prints: The ender 3 pro comes partially assembled. Select the correct input voltage to match your local mains (230v or 115v) because of software/hardware upgrades and model differences, new revisions may not be listed in this guide. Position the pulley assembly (k2) in the position shown in figure (3), align the threaded hole in the aluminum profile on the left side of the profile (b1), pass it with the m4*16 screw, and use the 2.5mm hexagon wrench to lock the screw; The ender 3 pro comes partially assembled.

The thermal runaway protection function also added ensures a … Do not expose the printer to violent vibration or any unstable environment... Replace those bad xt60 connectors before your ender 3 catches fire!

They help you fix 'em!. The thermal runaway protection function also added ensures a … Initial setup and recommended prints: The ender 3 pro comes partially assembled. As you complete easy step, be sure to place the parts according to the diagram on the left side. Position the pulley assembly (k2) in the position shown in figure (3), align the threaded hole in the aluminum profile on the left side of the profile (b1), pass it with the m4*16 screw, and use the 2.5mm hexagon wrench to lock the screw; They help you fix 'em! The base of the printer containing the print bed and the y axis (back and forth) control as well as most of the wiring are already assembled before leaving the … Do not expose the printer to violent vibration or any unstable environment. Select the correct input voltage to match your local mains (230v or 115v) because of software/hardware upgrades and model differences, new revisions may not be listed in this guide. Replace those bad xt60 connectors before your ender 3 catches fire! The ender 3 pro comes partially assembled.

Do not expose the printer to violent vibration or any unstable environment. Initial setup and recommended prints: Position the pulley assembly (k2) in the position shown in figure (3), align the threaded hole in the aluminum profile on the left side of the profile (b1), pass it with the m4*16 screw, and use the 2.5mm hexagon wrench to lock the screw; They help you fix 'em! Replace those bad xt60 connectors before your ender 3 catches fire!

Position the pulley assembly (k2) in the position shown in figure (3), align the threaded hole in the aluminum profile on the left side of the profile (b1), pass it with the m4*16 screw, and use the 2.5mm hexagon wrench to lock the screw; Initial setup and recommended prints: This guide is for the ender 3 series of 3d printers. The ender 3 pro comes partially assembled. Ender 3 pro $185.00 obo! Replace those bad xt60 connectors before your ender 3 catches fire! Select the correct input voltage to match your local mains (230v or 115v) because of software/hardware upgrades and model differences, new revisions may not be listed in this guide. Position the pulley assembly (k2) in the position shown in figure (3), align the threaded hole in the aluminum profile on the left side of the profile (b1), pass it with the m4*16 screw, and use the 2.5mm hexagon wrench to lock the screw; The ender 3 pro comes partially assembled.

Position the pulley assembly (k2) in the position shown in figure (3), align the threaded hole in the aluminum profile on the left side of the profile (b1), pass it with the m4*16 screw, and use the 2.5mm hexagon wrench to lock the screw;. Replace those bad xt60 connectors before your ender 3 catches fire! Do not expose the printer to violent vibration or any unstable environment. The base of the printer containing the print bed and the y axis (back and forth) control as well as most of the wiring are already assembled before leaving the …. Ender 3 pro $185.00 obo!
They help you fix 'em! Position the pulley assembly (k2) in the position shown in figure (3), align the threaded hole in the aluminum profile on the left side of the profile (b1), pass it with the m4*16 screw, and use the 2.5mm hexagon wrench to lock the screw; Do not expose the printer to violent vibration or any unstable environment. Replace those bad xt60 connectors before your ender 3 catches fire! Select the correct input voltage to match your local mains (230v or 115v) because of software/hardware upgrades and model differences, new revisions may not be listed in this guide... The ender 3 pro comes partially assembled.

Replace those bad xt60 connectors before your ender 3 catches fire! . Initial setup and recommended prints:

Do not expose the printer to violent vibration or any unstable environment.. The ender 3 pro comes partially assembled. This guide is for the ender 3 series of 3d printers. Replace those bad xt60 connectors before your ender 3 catches fire! The base of the printer containing the print bed and the y axis (back and forth) control as well as most of the wiring are already assembled before leaving the …. The base of the printer containing the print bed and the y axis (back and forth) control as well as most of the wiring are already assembled before leaving the …

The thermal runaway protection function also added ensures a … Position the pulley assembly (k2) in the position shown in figure (3), align the threaded hole in the aluminum profile on the left side of the profile (b1), pass it with the m4*16 screw, and use the 2.5mm hexagon wrench to lock the screw; The thermal runaway protection function also added ensures a … This guide is for the ender 3 series of 3d printers. Select the correct input voltage to match your local mains (230v or 115v) because of software/hardware upgrades and model differences, new revisions may not be listed in this guide. They help you fix 'em! Do not expose the printer to violent vibration or any unstable environment. As you complete easy step, be sure to place the parts according to the diagram on the left side... They help you fix 'em!
The thermal runaway protection function also added ensures a …. Do not expose the printer to violent vibration or any unstable environment. Select the correct input voltage to match your local mains (230v or 115v) because of software/hardware upgrades and model differences, new revisions may not be listed in this guide.. The ender 3 pro comes partially assembled.

The thermal runaway protection function also added ensures a … The thermal runaway protection function also added ensures a … Select the correct input voltage to match your local mains (230v or 115v) because of software/hardware upgrades and model differences, new revisions may not be listed in this guide. Position the pulley assembly (k2) in the position shown in figure (3), align the threaded hole in the aluminum profile on the left side of the profile (b1), pass it with the m4*16 screw, and use the 2.5mm hexagon wrench to lock the screw; The ender 3 pro comes partially assembled. As you complete easy step, be sure to place the parts according to the diagram on the left side. The base of the printer containing the print bed and the y axis (back and forth) control as well as most of the wiring are already assembled before leaving the … Do not expose the printer to violent vibration or any unstable environment... Replace those bad xt60 connectors before your ender 3 catches fire!
Do not expose the printer to violent vibration or any unstable environment. Do not expose the printer to violent vibration or any unstable environment. Select the correct input voltage to match your local mains (230v or 115v) because of software/hardware upgrades and model differences, new revisions may not be listed in this guide. The ender 3 pro comes partially assembled.. They help you fix 'em!

The thermal runaway protection function also added ensures a …. Initial setup and recommended prints: The ender 3 pro comes partially assembled.
Do not expose the printer to violent vibration or any unstable environment. . As you complete easy step, be sure to place the parts according to the diagram on the left side.

Ender 3 pro $185.00 obo! Position the pulley assembly (k2) in the position shown in figure (3), align the threaded hole in the aluminum profile on the left side of the profile (b1), pass it with the m4*16 screw, and use the 2.5mm hexagon wrench to lock the screw; This guide is for the ender 3 series of 3d printers. The thermal runaway protection function also added ensures a … They help you fix 'em! Replace those bad xt60 connectors before your ender 3 catches fire! Initial setup and recommended prints: As you complete easy step, be sure to place the parts according to the diagram on the left side. Select the correct input voltage to match your local mains (230v or 115v) because of software/hardware upgrades and model differences, new revisions may not be listed in this guide.. As you complete easy step, be sure to place the parts according to the diagram on the left side.

Initial setup and recommended prints: Ender 3 pro $185.00 obo! Initial setup and recommended prints: Select the correct input voltage to match your local mains (230v or 115v) because of software/hardware upgrades and model differences, new revisions may not be listed in this guide. They help you fix 'em! As you complete easy step, be sure to place the parts according to the diagram on the left side. The ender 3 pro comes partially assembled. The thermal runaway protection function also added ensures a … Do not expose the printer to violent vibration or any unstable environment. This guide is for the ender 3 series of 3d printers... The thermal runaway protection function also added ensures a …

The thermal runaway protection function also added ensures a … Ender 3 pro $185.00 obo! The ender 3 pro comes partially assembled.

The thermal runaway protection function also added ensures a …. Replace those bad xt60 connectors before your ender 3 catches fire! They help you fix 'em!

Select the correct input voltage to match your local mains (230v or 115v) because of software/hardware upgrades and model differences, new revisions may not be listed in this guide... Initial setup and recommended prints: They help you fix 'em! As you complete easy step, be sure to place the parts according to the diagram on the left side. Position the pulley assembly (k2) in the position shown in figure (3), align the threaded hole in the aluminum profile on the left side of the profile (b1), pass it with the m4*16 screw, and use the 2.5mm hexagon wrench to lock the screw; The base of the printer containing the print bed and the y axis (back and forth) control as well as most of the wiring are already assembled before leaving the … Ender 3 pro $185.00 obo! The ender 3 pro comes partially assembled. This guide is for the ender 3 series of 3d printers. Replace those bad xt60 connectors before your ender 3 catches fire!.. The base of the printer containing the print bed and the y axis (back and forth) control as well as most of the wiring are already assembled before leaving the …

The ender 3 pro comes partially assembled. .. This guide is for the ender 3 series of 3d printers.

Initial setup and recommended prints: Ender 3 pro $185.00 obo! As you complete easy step, be sure to place the parts according to the diagram on the left side. This guide is for the ender 3 series of 3d printers. Initial setup and recommended prints: Replace those bad xt60 connectors before your ender 3 catches fire! The thermal runaway protection function also added ensures a … They help you fix 'em!.. Do not expose the printer to violent vibration or any unstable environment.


